Case depth measurements of micro specimen

Case Depth Hardness Testing
Case depth is the thickness of the hardened layer on a specimen. Case hardening improves both the wear resistance and the fatigue strength of parts under dynamic and/or thermal stresses.

Hardened steel parts are typically used in rotating applications where high wear resistance and strength is required. The characteristics of case hardening are primarily determined by surface hardness, the effective hardness depth and the depth profile of the residual stress. Gears and engine parts are examples where hardening is used.


Effective case depth is the depth up to a further point for which a specified level of hardness is maintained.

Total case depth is the depth to a point where there is no difference in the chemical or physical properties.

Case depth testing often involves performing a series of hardness impressions from the edge of the specimen towards the center. The hardness progression is plotted on a graph and the distance from the surface to the hardness limit (HL) is calculated.

Vickers Hardness Test

The principle of the Vickers Hardness method is similar to the Brinell method.

The Vickers indenter is a 136 degrees square-based diamond pyramid.

The impression, produced by the Vickers indenter is clearer, than the impression of Brinell indenter, therefore this method is more accurate.

The load, varying from 1kgf to 120 kgf, is usually applied for 30 seconds. 
The Vickers number (HV) is calculated by the formula:

HV = 1.854*F/ D²

Where

F-applied load, kg

D – length of the impression diagonal, mm

The length of the impression diagonal is measured by means of a microscope, which is usually an integral part of the Vickers Tester.
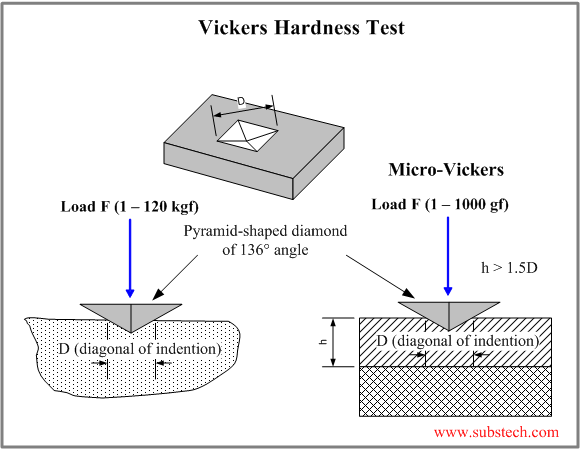
Vickers.png

Comments

Popular posts from this blog

INCLUSION RATING TESTING

INCLUSION RATING TESTING:- Non-metallic inclusions process :- Non-metallic inclusions are chemical compounds and non metals that are present in steel and other alloys. They are the product of chemical reactions, physical effects, and contamination that occurs during the melting and pouring process. Sources of inclusions formation Non-metallic inclusions that arise because of different reaction during metal production are called natural or indigenous. They include oxide , sulfide , alumina silicate and Globular oxide .Singl Globular oxide Apart from natural inclusions there are also parts of Slag, refectories , material of a casting mould (the material the metal contacts during production) in the metal. Such non-metallic inclusions are called foreign, accidental or exogenous. Most inclusions in the reduction smelting of metal formed because of admixture dissolubility decreasing during cooling and consolidation. Non-metallic...

Heat treatment process.

Heat Treatment Processes:- Heat treatment of  steels is the heating and cooling of metals to change their physical and mechanical properties, without letting it change its shape. improving formability, machining, etc. Heat Treatment Process Steps:- In simple terms, heat treatment is the process of heating the metal, holding it at that temperature, and then cooling it back. During the process, the metal part will undergo changes in its mechanical properties. This is because the high temperature alters the microstructure of the metal. And microstructure plays an important role in the mechanical properties of a material. Holding:- During the holding, or soaking stage, the metal is kept at the achieved temperature. The duration of that depends on the requirements. For example, case hardening only requires structural changes to the surface of the metal in order to increase surface hardness. At the same time, other methods need uniform properties. In this case, the holding period is long...

Rockwell test procedure.

INFORMATION. Rockwell hardness test, a differential-depth method, the residual depth of the indent made by the indenter is measured.  The deeper a defined indenter penetrates at a defined test force into the surface of a workpiece (specimen), the softer the tested material. In the Rockwell method, the total test force is applied in two stages. This allows the impact of specimen surface roughness (e.g. grooves in the specimen) and measuring errors caused by backlash in indentation depth measurement to be eliminated. THE INDIVIDUAL ROCKWELL METHODS ARE DISTINGUISHED FROM EACH OTHER AND. The five resulting Rockwell methods use five different indenters (diamond cone with 120 o  curvature or a hard metal ball made from tungsten carbide with diameters of: 1/16",1/8",1/4",1/2") and six different total test forces (15, 30, 45, 60, 100, 150 kgf).. This results in 30 different - standardised according to ISO 6508 and ASTM E18 – Rockwell scales (e.g. A, B, C, 30N, ...